Toon Material Shader
These toon shaders were developed by myself for Unity’s universal render pipeline using Unity’s Shadergraphs package and a couple custom functions written in HLSL.
Main Light
Unity’s Shadergraphs package does not include a built-in node for getting the main light source to use in the graph in Unity 2021.3.5f. Since this shader uses the Blinn-Phong lighting model in order to achieve the toon shaded look, I created my own custom function for use in the graph rather than using URP’s standard lighting model. This is then used in an unlit graph to achieve the basic lighting set up.
Get Main Light Code
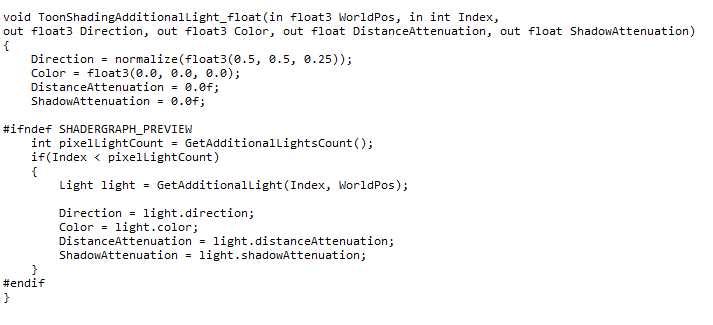
Get Additional Light Code
Extra Lights
Currently this would only allow one light for shading, but there are often times when a designer might want more than one light in the scene to affect the shader. In order to achieve this functionality I wrote another custom function to be used within the graph, which gets additional light sources. It is very similar except it indexes the additional lights in order to differentiate between each additional light.
Diffuse Lighting
In order to get a base to work with I created a basic diffuse lighting setup using a custom function node with the ToonShadingMainLight function I created.
Diffuse Lighting Node Setup
Specular Lighting
After the Diffuse lighting is set up, then I created a basic specular light setup which takes in the smoothness parameter. When the smoothness is increased the specular shine becomes sharper and smaller, and as it is decreased it becomes softer and larger. At the end it is multiplied with the diffuse lighting’s output before coloring. This guarantees that the specular highlight only appears where the diffuse lighting is present.
Specular Lighting Node Setup
Fresnel Lighting
After this a simple fresnel lighting set up is also created. The fresnel allows the shape of the shaded object to be more visible against various backgrounds. This set up takes in a fresnel size parameter which allows the designer to adjust the fresnel’s size. This set up is also multiplied with the output of the diffuse lighting before coloring to guarantee that the fresnel only appears where diffuse light is present.
Fresnel Lighting Node Setup
Cel Shading
In order to achieve a cel shaded look, I used a smoothstep node. This allows for a small amount of falloff in the lighting between cels. This gives a quasi-anti-aliasing effect, making the transition between the cels much less harsh than a hard cutoff would. The cutoff transition is determined by two parameters, the lighting cuttoff, which determines how much light must be reaching a section of the object in order for it to be lit. The second parameter is the lighting falloff, which affects how sharp the fade between the lit and unlit section is. After the cutoff, the diffuse lighting output is multiplied by a color parameter to color the object.
Diffuse Cel Shading Node Setup
Ambient Light
Normally ambient light is added to the whole object after it has been shaded, but this leads to the effect of washing out the colors on the whole object and brightening its whole surface. This wouldn’t be what is desirable for toon shading, so instead I decided to use ambient light as a parameter which raises the brightness of the areas darker than the ambient light to match its brightness. It is applied after shading and before coloring the diffuse lighting.
Ambient Light Node Setup
Specular Cel Shading Node Setup
Fresnel Cel Shading Node Setup
Additive Lighting
Since lighting is additive, we can simply add the output of each lighting component (diffuse, specular, and fresnel) together in order to see the shaded object. In order to make the shading more visible I changed the default diffuse color to blue.
Additive Lighting Node Setup
Additional Lights
Additional Diffuse Light Node Set-up
Using the custom function I wrote I can support additional lights for my shader, I simply must change the index parameter for each additional light I want to support, and add their outputs together. The addition specular lights will also be affected by the smoothness parameter in the same way as the main light’s specular highlight.
Additional Specular Light Node Setup
Additional Light Support
In order to add in the additional light, I clamp the inpcoming step value for the smoothstep function then add the additional light to it. I also use the saturate output in the main specular calculation and fresnel calculation instead of the multiply. For the specular I add it to to the specular setup before the smoothstep function.
Additional Diffuse Light Support
Additional Specular Light Support
Texture Support
Texture Support Node Setup
In order to add texture support all I did is multiply a diffuse texture with the diffuse output.


